

How to Dockerize a Spring Boot App with PostgreSQL
A step-by-step guide to containerizing a Spring Boot app with PostgreSQL


In this article, I will show you how to use Docker with SpringBoot and PostgreSQL, to follow up you should have a basic understanding of what is Docker, Maven installed, experience with Spring Boot and an IDE of your choice.
Notice: If you already have a Spring Boot application you can skip sections 1 and 2 and go directly to section 3 and follow along.
Here you can find the code and other resources used in this demonstration (github.com)
1 - What we will build?
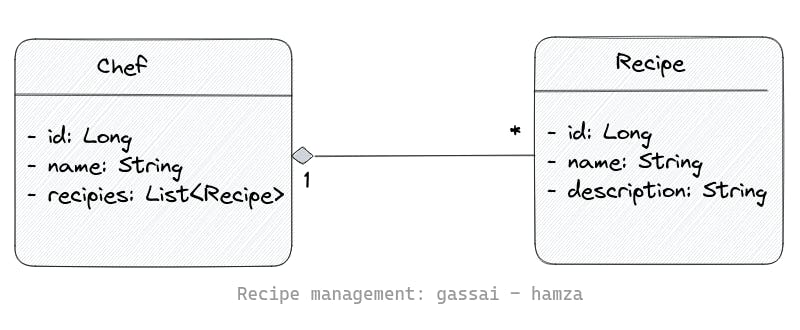
For demo purposes, we will create a simple recipe management app with two entities: Chef and Recipe.
2 - Create a spring boot application
For this, you can either use spring initializr or spring initializr plugin if you are using IntelliJ idea. and select the following dependencies: Spring Web, PostgreSQL Driver and of course Spring Data JPA and make sure to choose maven as a project manager.

After installing the project extract it and open it with your favorite IDE.
as mentioned in the first section we will create two entities Chef and Recipe. as follows:
- Chef:
@Entity
public class Chef {
    @Id
    @GeneratedValue(strategy = GenerationType.IDENTITY)
    private Long id;

    private String name;

    @OneToMany(mappedBy = "chef")
    private List<Recipe> recipes;

    public Chef() {
    }

    public Chef(Long id, String name) {
        this.id = id;
        this.name = name;
    }

    public Chef(String name) {
        this.name = name;
    }

    // ADD GETTERS AND SETTER...
}
- Recipe
@Entity
public class Recipe {
    @Id
    @GeneratedValue(strategy = GenerationType.IDENTITY)
    private Long id;

    @Column(length = 100)
    private String name;
    private String description;

    @ManyToOne
    @JsonBackReference
    private Chef chef;

    public Recipe() {
    }

    public Recipe(String name, String description) {
        this.name = name;
        this.description = description;
    }

    public Recipe(Long id, String name, String description) {
        this.id = id;
        this.name = name;
        this.description = description;
    }

    // GETTERS AND SETTERS...
}
We need also to create ChefController, ChefService, ChefRepository and RecipeRepository.
ChefService: has three basic methods: createChefWithRecipes which takes as a parameter a chef and list of recipes, getChefs to get the list of chefs, and finally getNumberOfChefs returns the number of chefs in the database.
@Service
public class ChefService {
    private ChefRepository chefRepository;
    private RecipeRepository recipeRepository;

    public ChefService(ChefRepository chefRepository, RecipeRepository recipeRepository) {
        this.chefRepository = chefRepository;
        this.recipeRepository = recipeRepository;
    }

    @Transactional
    public Chef createChefWithRecipes(Chef chef,List<Recipe> recipes){

        recipes.stream().forEach(recipe -> recipe.setChef(chef));

        this.chefRepository.save(chef);
        this.recipeRepository.saveAll(recipes);

        return chef;
    }

    public List<Chef> getChefs(){
        System.out.println(this.chefRepository.findAll());
        return this.chefRepository.findAll();
    }

    public Long getNumberOfChefs(){
        return this.chefRepository.count();
    }
}
ChefController: it has only one method which returns a list of chefs
@RestController
@RequestMapping("/api/chefs")
public class ChefController {

    private final ChefService chefService;

    public ChefController(ChefService chefService) {
        this.chefService = chefService;
    }

    @GetMapping
    public List<Chef> getAllChefs(){
        return chefService.getChefs();
    }

}
And finally, we will add some initial rows to our database (optional), for this we will create a data initializer class and implement the run method from the command runner interface.
@Component
public class DataInitializer implements CommandLineRunner {

    private final ChefService chefService;

    public DataInitializer(ChefService chefService) {
        this.chefService = chefService;
    }

    @Override
    public void run(String... args) throws Exception {

        if(chefService.getNumberOfChefs() > 1) {
            System.out.println("Chefs already initialized!");
            return;
        }

        Chef chef1 = new Chef("Gordon Ramsay");
        Chef chef2 = new Chef("Jamie Oliver");
        Chef chef3 = new Chef("Anthony Bourdain");

        List<Recipe> chef1Recipes = Arrays.asList(
                new Recipe("Beef Wellington", "A classic British..."),
                new Recipe("Scrambled Eggs", "A simple breakfast..."),
                new Recipe("Beef Burger", "A juicy burger made...")
        );

        List<Recipe> chef2Recipes = Arrays.asList(
                new Recipe("Spaghetti Carbonara", "A creamy pasta...")
                new Recipe("Roast Chicken", "A classic roastchicken"),
                new Recipe("Fish and Chips", "A traditional...")
        );

        chefService.createChefWithRecipes(chef1,chef1Recipes);
        chefService.createChefWithRecipes(chef2,chef2Recipes);
        chefService.createChefWithRecipes(chef3,new ArrayList<>());

    }
}
3 - Package the application into a JAR file
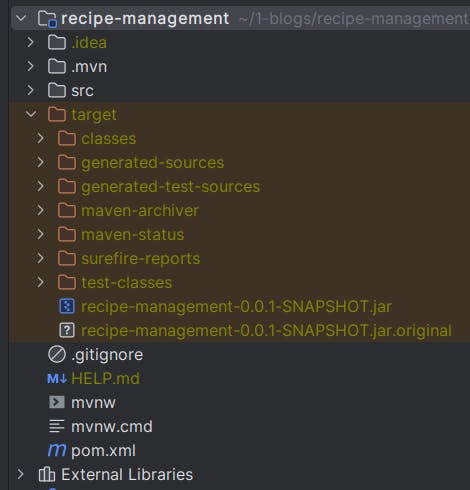
Simply run the command mvn package and check that a jar file is generated under the folder target.
mvn package -DskipTests
Note that we have used -DskipTests option to skip tests because our application will attempt to connect to a database that does not exist yet.
The generated JAR file of our Spring Boot application is an executable archive that contains all the necessary components and dependencies required to run the application such as the compiled code, dependencies, embedded server and some additional resources...
We can simply run our application using the command java -jar target/recipe-management-0.0.1-SNAPSHOT.jar, this is exactly the command that we will need to run the application inside a container.
4 - Create the application's image (Dockerfile)
Here is the fun part!! But first, what is a docker file?
A Dockerfile is a text document that contains a set of instructions to build an image, these instructions could be extracting and copying files, or running commands...
Ok, let's create one in the root directory of our application, it should be named Dockerfile with a capital "D" (Actually you can name it whatever you want, but to avoid headaches in the next steps let's respect the convention)
FROM openjdk:17
VOLUME /tmp
EXPOSE 8080
COPY target/recipe-management-0.0.1-SNAPSHOT.jar recipe.jar
ENTRYPOINT ["java","-jar","/recipe.jar"]
FROM openjdk:17: Every docker image needs a base image that contains the core operating system and other runtime components, and since we have a Spring Boot application we pulled the
OpenJDK:17 Java Runtime Environment (JRE).VOLUME /tmp : (optional) This instruction specifies that the
/tmpdirectory in the docker container will be used as a volume to store temporary files and cache data... to share it between the docker container and the host filesystem or between the containers.EXPOSE 8080: This instruction informs Docker that the container will listen to port
8080at runtime.COPY target/recipe-management-0.0.1-SNAPSHOT.jar recipe.jar: This instruction copies the
JARfile to the working directory of the image which is by default/, the copiedJARfile will be renamed to:recipe.jar. (We can change the working directory usingWORKDIRinstruction).ENTRYPOINT ["java","-jar","/recipe.jar"]: For the first part
ENTRYPOINTis used to configure the command that will be executed when a container is started, and as you may guess the second part specifies the actual command that runs our application.
Ok, we are ready to make some tests!! let's first build an image by running the command:
docker build . -t recipe:v1
The command above tells Docker to build the image from the file Dockerfile in the current directory. we can optionally use -t option to specify a name and a tag for our image.
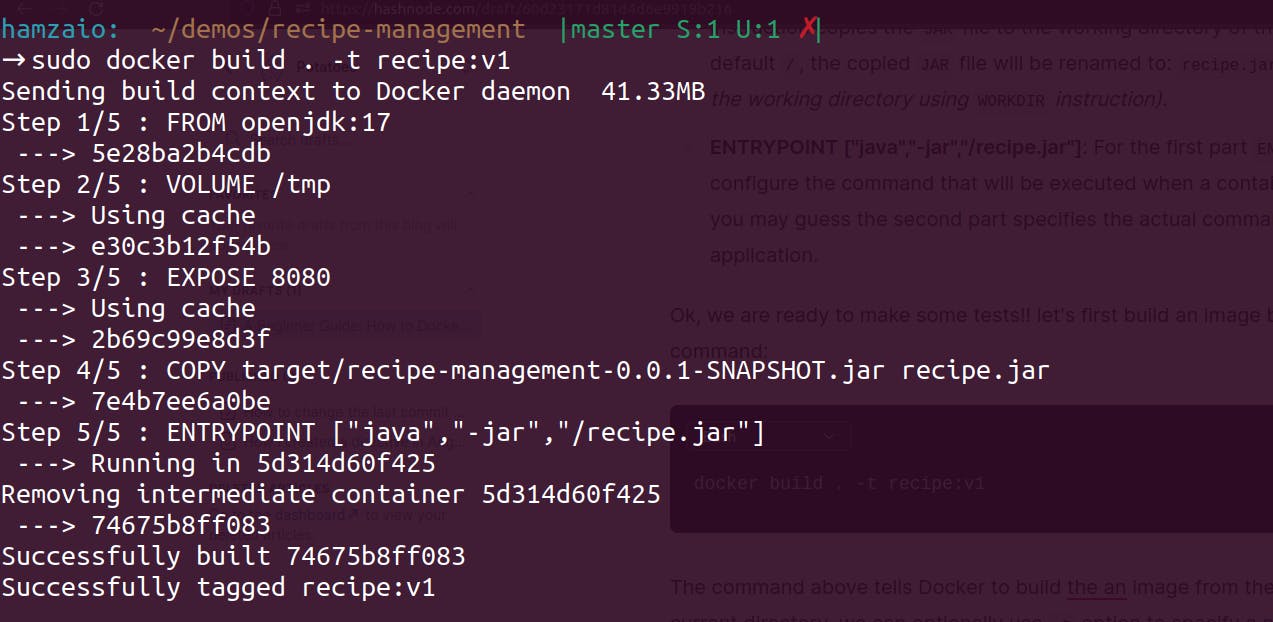
Now we have built our image successfully with the name and tag recipe:v1.
We can simply check that our image exists by running the command: docker images:

5 - Creating containers
In this section, we will put everything together by creating a container of our app and linking it with a PostgreSQL database container since our app requires a database.

We can achieve this in different ways but the most common and clear is using Docker Compose.
Docker Compose allows us to define and configure all of our application containers, link them together and specify dependencies between them in a single file: docker-compose.yml.
version: "3.8"

services:
  psql-db:
    image: postgres
    container_name: psql-db
    restart: always
    environment:
      - POSTGRES_USER=admin
      - POSTGRES_PASSWORD=1234
      - POSTGRES_DB=recipe
    ports:
      - '5432:5432'

  recipe:
    container_name: recipe_app
    build:
      context: .
      dockerfile: Dockerfile
    ports:
      - '8081:8080'
    environment:
      - SPRING_DATASOURCE_URL=jdbc:postgresql://psql-db:5432/recipe
      - SPRING_DATASOURCE_USERNAME=admin
      - SPRING_DATASOURCE_PASSWORD=1234
      - SPRING_JPA_HIBERNATE_DDL_AUTO=update
    depends_on:
      - psql-db
First, we define the
ymlversion.Create the first container
psql-dbby using the Postgres official imageimage: postgres.We give the container a name (optional)
container_name: psql-db.The
restart: alwaysparameter ensures that the container automatically will restart if it crashes.The
environmentoption could be different from one container to another for our Postgres database we need to have a database user, password, and name...The
portsoption maps the container's internal port (on the left side5432:) to the host port5432. This allows other services running on the same host to connect to the Postgres database in thepsql-dbcontainer using the host's IP address and port5432.For the the
recipecontainer we have made some small changes, we usedbuildto tell Docker to build a new image from ourDockerfile.We specified also in the environment section the database URL, USERNAME, and PASSWORD. notice that the database URL contains the name of the
Postgrescontainer and its port:jdbc:postgresql://psql-db:5432/recipe.Finally,
depends_onoption tells therecipecontainer that it should not start until thepsql-dbcontainer is running.
Now we are ready to create our containers using docker-compose.
(If you are on a Linux machine, you will need to install Docker Compose)
If your docker-compose.yml file in the root of your project just run:
docker-compose up
# you can also use -d tag to start containers in the background.
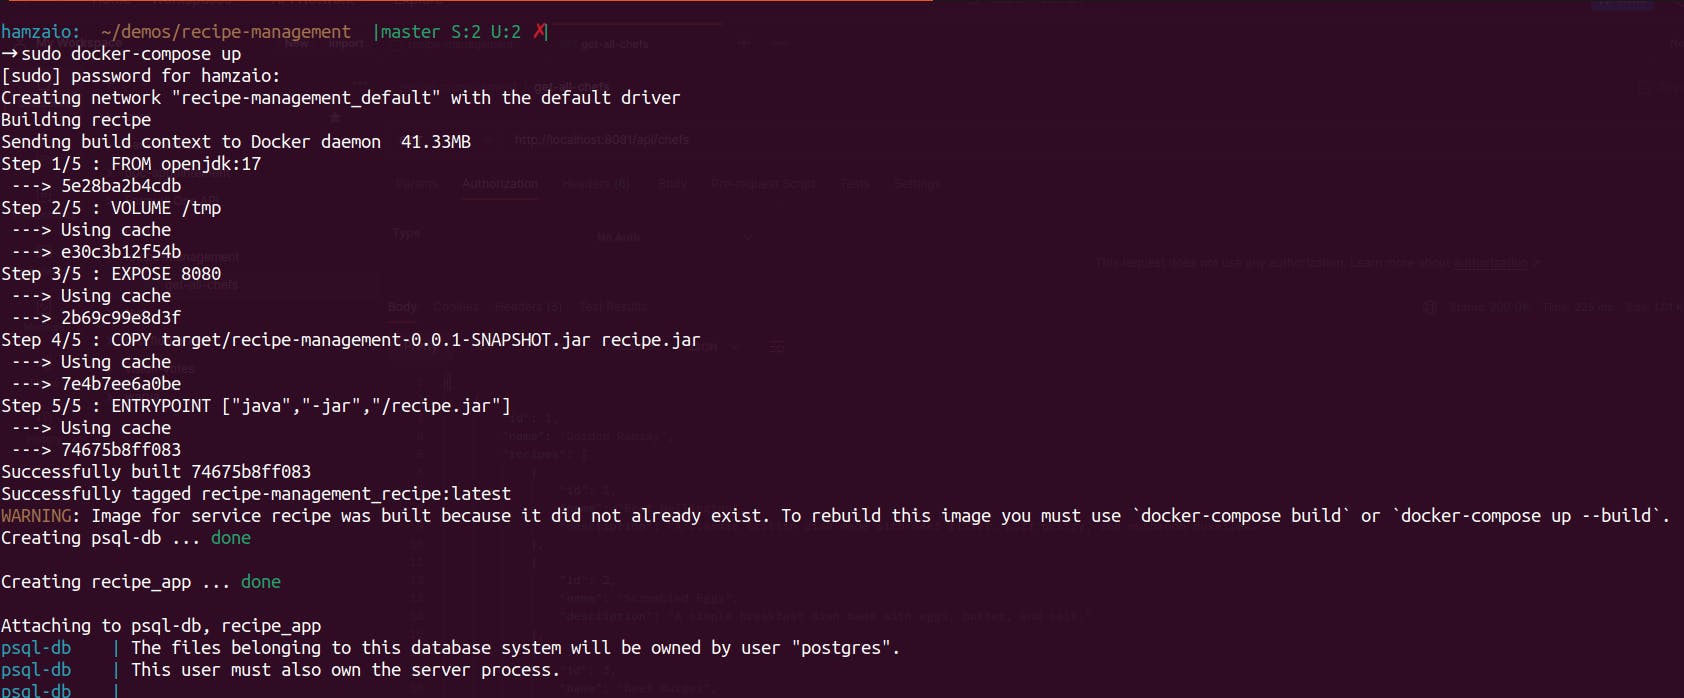
From the first few lines, it looks clear that docker has successfully built the recipe image based on the instructions from Dockerfile, it also created our psql-db and recipe_app containers and attached psql-db to recipe_app container.
Let's make an http request to make sure that everything is working as expected!
The endpoint is http://localhost:8081/api/chefs and notice that we used the port 8081.
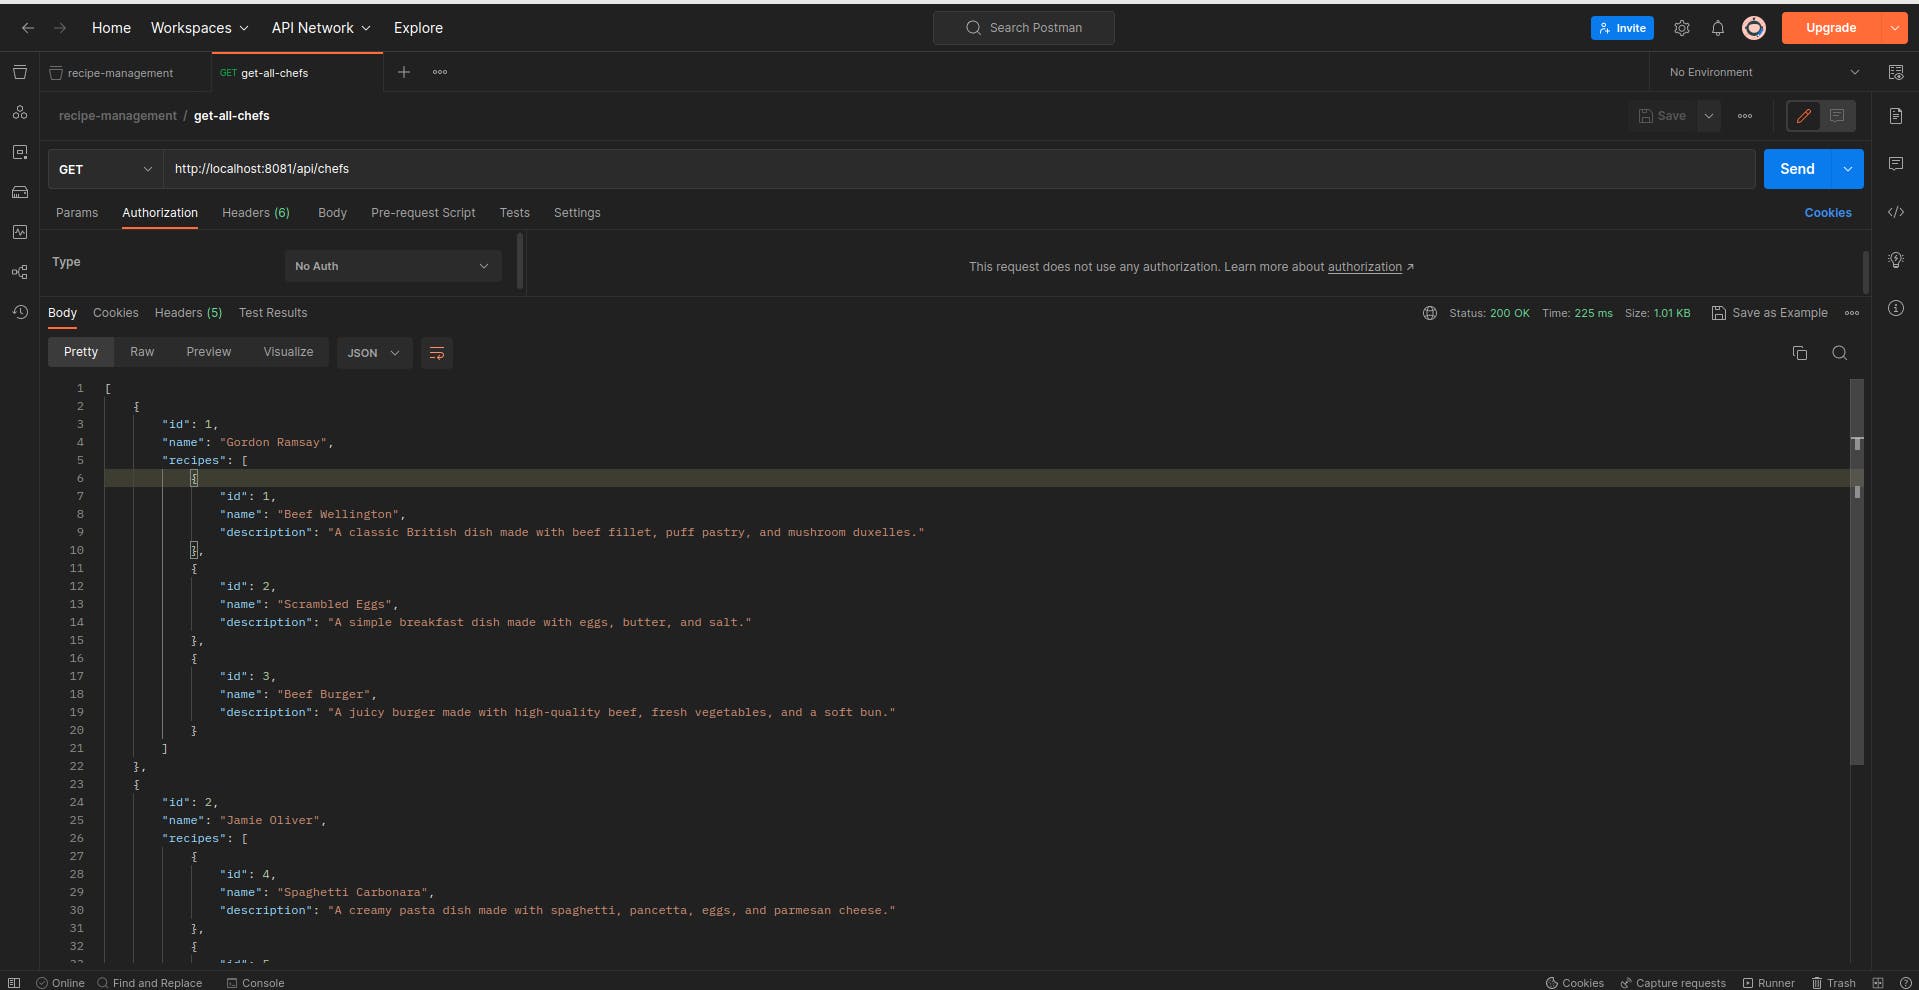
Et Voila! the application is containerized! now we can share it with anyone have docker in his machine.